Oracle ODBC Driver Configuration in Windows XP
 To start doing JDBC programs in your local machines you should configure the following softwares:
1. Install Java 1.5 or higher version
2. Install Oracle XE (recommended)
3. Set up classpaths for Java and Oracle and ojdbc14 jar file
These three are common things need to be installed in your system to learn JDBC. Make sure Java and Oracle is working fine with out any problems. To run JDBC programs we should configure a Driver Connection to Java and Oracle to interact each other. For that we have Drivers like a bridge for these two. The Oracle ODBC Driver provides access to Oracle databases for applications written using the ODBC interface.
Setting up an Oracle ODBC Driver and Data Source
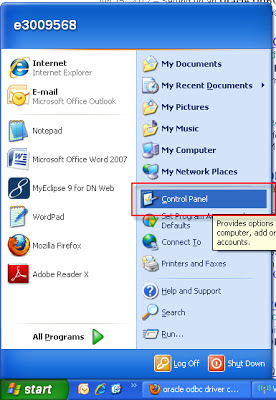
Step: #1 In the Windows Start menu , click on the Control Panel icon.
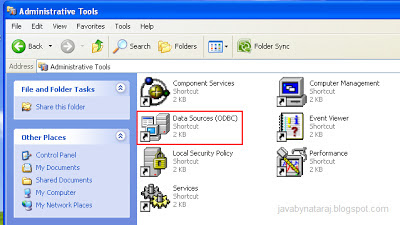
Step: #2 If you are able to see the 'Performance and Maintenance' icon click on it other wise click on 'Administrative Tools' icon.
Step: #3 In Administrative Tools you can find Data Sources (ODBC) icon to setup. Click on it to open
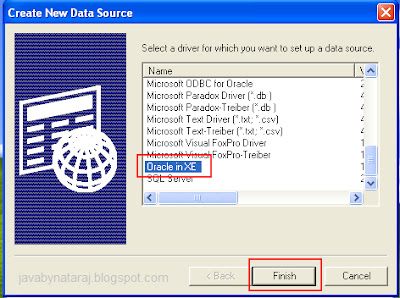
Step: #4 You can see a window named 'Create New Data Source' with list of drives, in that Select Oracle in XE driver then click Finish button.
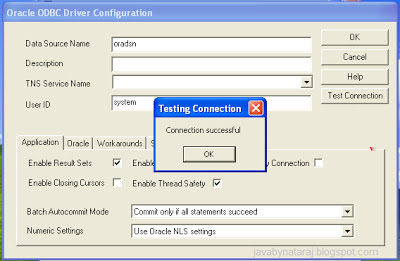
Step: #5 In the ‘Oracle ODBC Driver Configuration’ dialog, enter the details of your data source name and UserID of your Database as by default 'system' or 'SYSTEM' . Then click on Ok.
Step: #6 Click ‘Test Connection’ to ensure your settings are all correct.When prompted, enter the database login credentials.
Click OK to complete the Setting up Configuring Oracle ODBC Data Source Name.
